Install WordPress in cPanel with Softaculous: every field explained
Install WordPress with Softaculous in cPanel, what to enter in every field, the first settings to change after installing, plus manual and WP-CLI alternatives.
The short answer
In cPanel, open Softaculous, choose WordPress and Install Now, pick https and your domain, and leave In Directory empty so the site opens at the domain root. Use an admin username other than admin, a strong generated password and an email you read. In Advanced Options, turn on automatic minor updates and automated backups, ideally to a remote location. After installing, check both site URLs use https, set the timezone and Post name permalinks, delete sample content and set up SMTP for email.
Reading options
On this page
- The whole process at a glance
- Before you start
- Step 1: Open Softaculous and choose WordPress
- Step 2: Fill in the install screen, field by field
- Step 3: Install and log in
- Step 4: Your first twenty minutes in WordPress
- No Softaculous? Install WordPress manually
- Prefer the command line? Use WP-CLI
- Troubleshooting
- The one message worth forwarding
- Reader questions
- Sources & further reading
If your hosting includes Softaculous, installing WordPress takes about five minutes: open Softaculous from cPanel, pick WordPress, choose https:// and your domain, leave the directory box empty, set a site name, create an admin account with a username that is not "admin" and a strong password, and click Install. The installer is the easy part. The choices you make on that one screen, and the twenty minutes of setup afterwards, decide whether your site starts out secure, fast and easy to look after.
A made-up example of how a small choice bites later. Leila installs WordPress for her new bakery website and, out of habit, types wp in the directory box because a tutorial had it. The site works, at https://leilabakes.example/wp. Three weeks later she has printed flyers with the plain domain on them, and every customer who types it in lands on an empty page. Moving WordPress out of a folder is fixable, but it is a fiddly job that one empty box would have avoided.
This guide goes through every field on the Softaculous install screen, what to put in each and why, the first settings to change after installing, and two alternatives (manual install and WP-CLI) for when Softaculous is not available.
The whole process at a glance
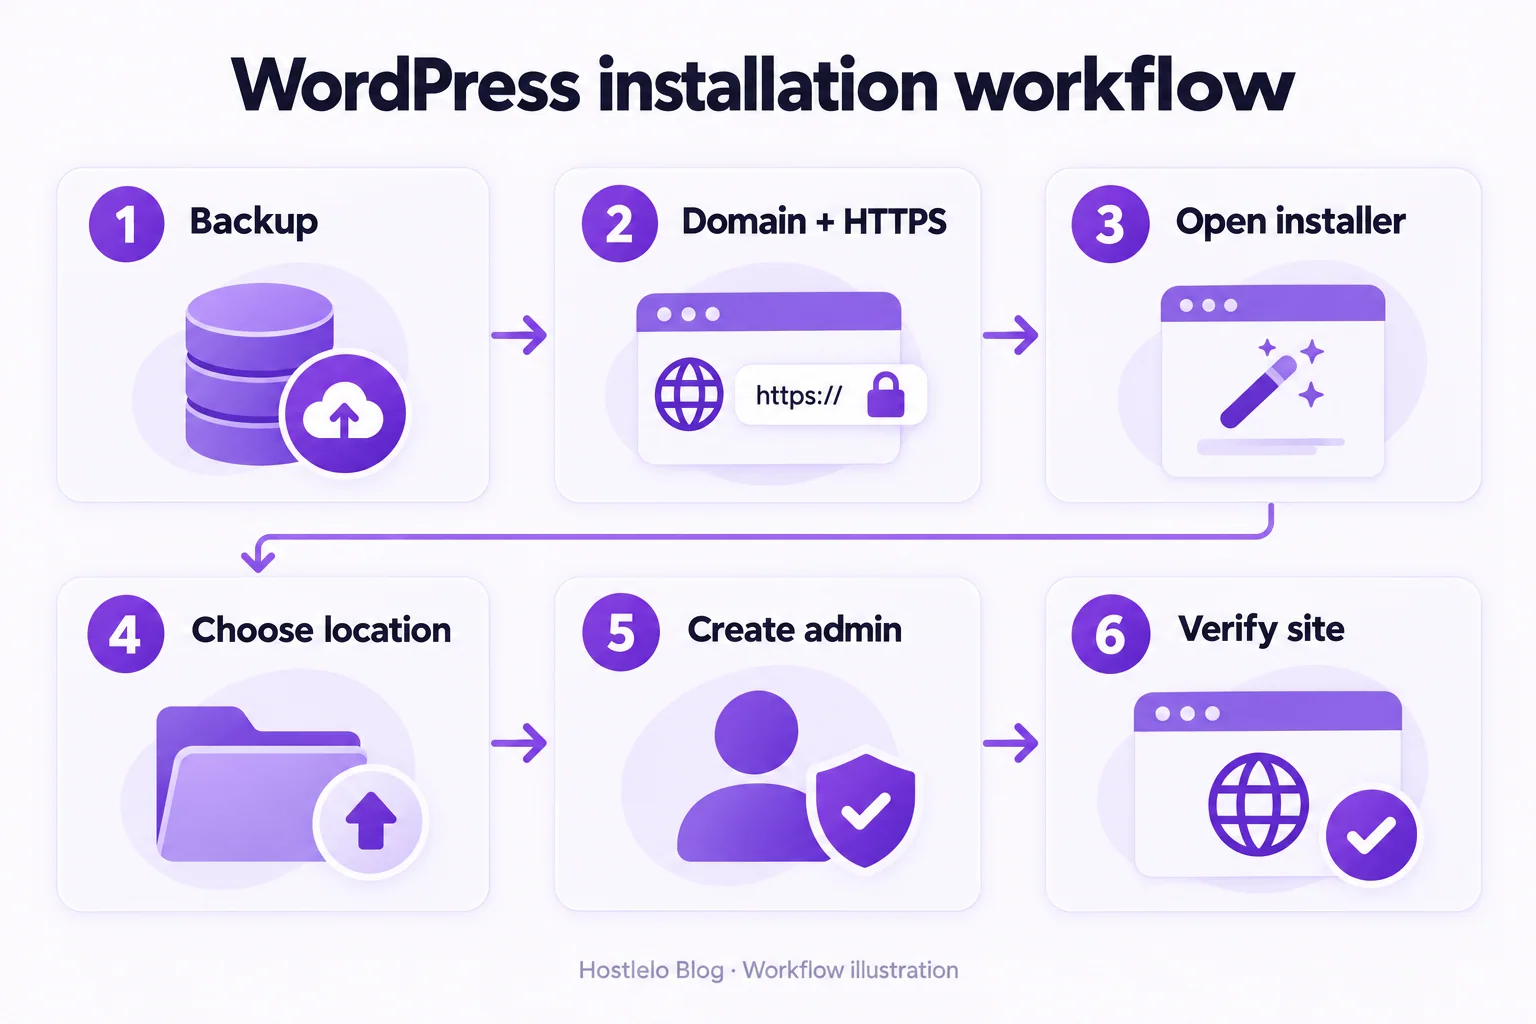
In short: back up anything already on the domain, make sure the domain points at your hosting and has HTTPS, open the installer, choose the location, create the admin account, then check the new site works.
Before you start
- A hosting account with cPanel and your login details. Softaculous is an optional add-on, so not every plan has it. If you cannot find it, ask your host, or use the manual or WP-CLI method further down.
- A domain connected to the hosting. It should already show your hosting's default page or an existing site. If you are still pointing it, follow our guide on connecting a domain to hosting first, and give DNS time to settle.
- An SSL certificate for the domain. Most cPanel hosts issue one automatically once the domain points at the server. Check by opening
https://yourdomainin a browser and looking for the padlock. Starting with HTTPS saves you a URL change later. - A supported server. At the time of writing, WordPress.org recommends PHP 8.3 or greater, MariaDB 10.11 or greater or MySQL 8.0 or greater, and HTTPS support. It notes that WordPress still runs on older versions, but those have reached end of life and may expose your site to security problems. You can see and usually change the PHP version in cPanel (often under Software, as Select PHP Version or MultiPHP Manager, depending on the server).
- A password manager to generate and store the admin password.
- A backup, if anything is already on the domain. Installing into a folder that already has a site can overwrite files.
Step 1: Open Softaculous and choose WordPress
- Log in to cPanel.
- Find Softaculous Apps Installer (usually in the Software section, or search for "Softaculous" in the cPanel search box). Some hosts also show a WordPress icon that opens the same installer.
- Click WordPress, then Install Now. If you see a choice between a quick install and a custom install, pick the custom one so you can see every option.
Step 2: Fill in the install screen, field by field
Softaculous labels can vary slightly between versions and hosts, but the screen is broadly the same everywhere.
Choose Installation URL
- Choose Protocol: pick
https://(with or withoutwww., depending on how you want your address to look). Choosehttps://www.only if thewwwversion also has a valid certificate. - Choose Domain: pick the domain from the list. If it is missing, the domain is not yet added to this hosting account.
- In Directory: leave this box empty to install WordPress at the root of the domain, so the site opens at
https://yourdomain/. Softaculous often pre-fills something likewp; delete it. Only type a folder name if you deliberately want the site at an address likehttps://yourdomain/blog/.
The directory is part of every URL WordPress creates. Changing it later means moving files and updating addresses throughout the database.
Site Settings
- Site Name: your business or site name. It appears in the browser tab and in search results, and you can change it later under Settings > General.
- Site Description: a short tagline. Change the default text now, or clear it later.
- Enable Multisite (WPMU): leave this unticked. Multisite runs a network of several sites from one install, which most people do not need and which is harder to manage.
Admin Account
- Admin Username: pick something that is not
adminand not your domain name. Bots tryadminfirst on almost every WordPress site. Something likeleila-officeis fine. - Admin Password: use the generator or your password manager to create a long, random password. Softaculous shows a strength meter; aim for strong.
- Admin Email: an inbox you actually read. WordPress sends password resets and important notices here.
Never paste your admin username and password into a support chat, a screenshot or a public forum. If support needs access, ask how they prefer to receive it.
Choose Language
Pick the language for the dashboard and the default site text. You can change it later under Settings > General.
Select Plugin(s)
Softaculous may offer optional plugins here, such as a login-limiting plugin that slows down password-guessing bots. A login-limiting option is worth ticking. Leave anything you do not recognise unticked; you can always add plugins later, and every plugin is one more thing to keep updated.
Advanced Options
Click to expand this section. It is the part most people skip and the part that matters most for looking after the site.
- Database Name: leave the generated value. On cPanel, database names are automatically prefixed with your cPanel username.
- Table Prefix: the default is fine for most people. Changing it from the common
wp_is a small hardening step, but it is not real security on its own. - Disable Update Notifications Emails: leave unticked if you want emails when updates are available.
- Auto Upgrade: choose to upgrade at least to minor versions automatically. Minor releases are usually security and bug fixes. Major-version auto-upgrades are convenient but carry more risk of a plugin conflict, so pick that only if you also have reliable backups.
- Auto Upgrade WordPress Plugins and Auto Upgrade WordPress Themes: convenient for small sites with few, well-maintained plugins. If your site is business-critical, you may prefer to update these yourself after a backup.
- Backup Location: where Softaculous stores its backups. The default is on the same server. If your host offers a remote location, use it, because a backup on the same server will not help if that server has a problem.
- Automated backups: turn these on, for example daily or weekly depending on how often the site changes.
- Backup Rotation: how many backups to keep. A handful (for example 4) is a sensible start; more uses more disk space.
Email installation details to
Optionally type an email address to receive the installation summary. It is a useful record of the install path and database name.
Step 3: Install and log in
Click Install. Softaculous shows a progress bar, then a success message with two links: your site and the admin area. The admin area lives at https://yourdomain/wp-admin/. Log in with the username and password you just created.
Quick tip: bookmark the admin URL now, and save the login in your password manager, not in a text file on your desktop.
Step 4: Your first twenty minutes in WordPress
These settings are quick, and they are much easier to set now than after you have content.
- Settings > General: check that both WordPress Address (URL) and Site Address (URL) start with
https://. Set the Timezone to your city (pick a city, not a UTC offset, so daylight saving is handled), and choose your date and time format. - Settings > Permalinks: choose Post name, then Save Changes. This gives you clean addresses like
/chocolate-cake/instead of/?p=123. Set it before you publish, so links you share never change. - Settings > Reading: while you are building, you can tick Discourage search engines from indexing this site. Put a reminder in your calendar to untick it on launch day, because forgetting it keeps you out of search results.
- Delete the sample content: the "Hello world!" post (under Posts), the "Sample Page" (under Pages), and the sample comment.
- Users > Profile: set a Nickname and choose it under Display name publicly as, so your login username does not appear on posts.
- Plugins: delete plugins you will not use, including any that came pre-installed. Inactive plugins still need updates.
- Dashboard > Updates: install anything waiting.
- Email delivery: by default WordPress sends mail through the server, which often lands in spam. Set up an SMTP plugin with your real email provider and publish SPF, DKIM and DMARC records, as our email authentication guide explains. Then send a test from your contact form.
If the site feels slow once you add a theme and content, our LiteSpeed Cache guide covers caching step by step.
No Softaculous? Install WordPress manually
The official "famous 5-minute install" works on any cPanel hosting.
- Create a database and user: open cPanel > Databases > Database Wizard. Enter a database name, then a database username and a strong password, and on the privileges screen select ALL PRIVILEGES. Note the full names, including the cPanel username prefix.
- Upload WordPress: download the latest release from wordpress.org, then in cPanel > Files > File Manager open
public_html(or your domain's folder), upload the zip, and extract it. Move the contents of the extractedwordpressfolder into the domain's folder so thatwp-adminsits directly inside it. - Run the installer: visit
https://yourdomain/wp-admin/install.php. WordPress asks for the database name, username, password and host (usuallylocalhost), createswp-config.phpfor you, then asks for the site title, admin username, password, email, and whether to discourage search engines.
WordPress notes that all of this can be changed later in the admin screens.
Prefer the command line? Use WP-CLI
If your host provides SSH or cPanel > Advanced > Terminal, and WP-CLI is installed (check with wp --info), you can install in three commands. Create the database and user with the Database Wizard first, then run these from the domain's folder:
cd ~/public_html
wp core download
wp config create --dbname=cpuser_wpdb --dbuser=cpuser_wpuser --prompt=dbpass
wp core install --url=https://example.com --title="Example Bakery" --admin_user=leila-office --admin_email=you@example.com --prompt=admin_password
Replace the database names, site details and folder with your own. The --prompt option makes WP-CLI ask for the password instead of you typing it into the command, which keeps it out of your shell history. If you leave out --admin_password without prompting, wp core install generates a random password for you.
Troubleshooting
I cannot find Softaculous in cPanel
Use the cPanel search box. If it is not there, your plan does not include it. Ask your host, or use the manual or WP-CLI method above.
The domain is missing from the Choose Domain list
The domain has not been added to this hosting account. Add it in cPanel under Domains, or ask your host to attach it, then refresh Softaculous.
The site opens at /wp instead of the plain domain
WordPress was installed into a folder. For a brand-new site with no content, the simplest fix is to remove that installation in Softaculous and reinstall with the directory box empty. For a site with content, follow WordPress's documented process for moving it, or ask your host for help.
Softaculous says the folder is not empty
Something already exists at that location, often a default index.html page from the host or an old site. Back up anything you need, then remove the old files or let Softaculous overwrite them only if you are sure.
"Error establishing a database connection" after a manual install
The database name, username, password or host in wp-config.php does not match what you created. Check the full prefixed names in cPanel > Databases, and confirm the user was added to the database with all privileges.
The browser shows "Not secure" or mixed-content warnings
The certificate is missing, or WordPress was installed with http://. Check that https:// works, update both URLs under Settings > General, then set up a redirect as shown in our HTTPS redirect guide.
The installer finished, but the domain still shows the host's default page
There may be a default index.html file in the folder that loads before WordPress's index.php. Rename or delete it in File Manager. If DNS changed recently, the domain may also still point at the old server; see our DNS propagation guide.
The one message worth forwarding
If someone else is installing WordPress for you, send them this:
"Please install WordPress at the root of example.com using https, not in a subfolder. Use an admin username other than admin, a strong generated password stored in our password manager, automatic minor updates, and automated backups to a remote location if available. After installing, set permalinks to Post name and set up SMTP for email."
The takeaway: choose https://, leave the directory empty, avoid admin as a username, switch on updates and backups in Advanced Options, and spend twenty minutes on the first settings before you add content.
Reader questions
What should I put in the In Directory field?
Leave it empty to install WordPress at the root of your domain. Softaculous often pre-fills a folder name such as wp; delete it unless you deliberately want the site at an address like yourdomain/blog.
Should I choose http or https in Softaculous?
Choose https once the domain has a working SSL certificate. Starting with https avoids changing every URL later. Check by opening https://yourdomain in a browser and looking for the padlock first.
Why is Softaculous missing from my cPanel?
It is an optional add-on that not every hosting plan includes. Search cPanel for it, ask your host, or install WordPress manually with the Database Wizard and the official installer, or with WP-CLI.
Which PHP version should I use for WordPress?
WordPress.org currently recommends PHP 8.3 or greater, plus MariaDB 10.11 or greater or MySQL 8.0 or greater, and HTTPS. Older versions still run WordPress but have reached end of life.
Should I turn on auto upgrades in Softaculous?
Turn on automatic minor upgrades, which are usually security and bug fixes. Automatic major, plugin and theme upgrades are convenient for small sites but safer with reliable backups in place.
What should I do right after installing WordPress?
Check both site URLs use https, set your timezone, choose Post name permalinks, delete the sample post and page, set a public display name, remove unused plugins and set up SMTP so emails arrive.
Can I install WordPress from the command line in cPanel?
Yes, if your host provides SSH or Terminal with WP-CLI. Create a database first, then run wp core download, wp config create and wp core install from your domain's folder.
Was this guide helpful?
Help us make the next update better.
Sources & further reading
Originally published . About our editorial updates.